I remember how stressful and intimidating learning to properly gross a specimen can be, so with these guidelines and sample dictations, I hope to help those beginning this process learn the “basics” and have good technique.
While no two specimens are identical, the questions they pose are often very similar. Therefore, using good principles and planning (and with some knowledge of anatomy and experience), all specimens can be made approachable. Because no two specimens are identical, all of these templates are only general guidelines, which must be modified as necessary for each specific case.
The gross description should progress from overall to specific, from abnormal to normal, and from relevant to ancillary.
Goals of a Gross description and Grossing:
- Allow for the mental reconstruction of the specimen, including location, extent, and appearance of any lesions. It is the “permanent record” of a specimen’s macroscopic features as specimens are irrevocably changed after grossing and the remnants are often only kept for a month or so.
- Serve as a histologic section (slide) index.
- Record the distribution of tissue to any other studies (e.g., research, cytogenetics, flow cytometry, etc…)
Principles to always consider:
1) Have a plan. A chance to cut is a chance to irrevocably change a specimen and impact staging. Don’t cut blindly!
2) Know what’s at stake. Why did they do the surgery (e.g., for cancer vs a benign process)? What question(s) are you trying to answer? Look through the chart. Look at the staging guidelines ahead of time and know what the most crucial measurements are.
3) Have good hygiene. Only have one specimen out at a time and keep your area clean to prevent contamination. Clean the bench and instruments between cases. Know where your sharps are at all times (so you don’t get cut!). Get ink only where you want it.
4) In your gross description, Focus on the lesion. Be complete, but concise. Do not focus on the technical details of the dissection itself or normal anatomy.
Always include: Size, Appearance, Delineation (well-circumscribed vs poorly-circumscribed), Proximity to margins, involvement of adjacent structures.
5) Sample adequately but selectively. For tumors, the general rule is 1 section per 1cm of tumor to account for tumor heterogeneity. Focus on areas that look different and avoid necrosis. Only one section is usually necessary for grossly normal structures (e.g., normal appendix).
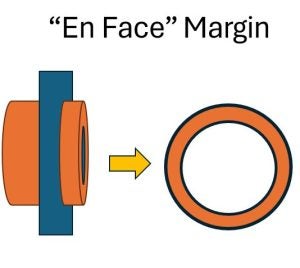
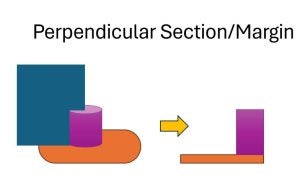
6) Sample margins appropriately. For margins relatively far away (and therefore expected to be negative), “En Face” (parallel) sections or representative sections are acceptable. For close (possibly positive) margins, perpendicular is preferable as it shows the approach of the specimen to the margin (and some margins are entirely submitted).
7) Don’t pack too much into a cassette. Tissue should only be about as thick as a nickel (a thick American coin) and not touching any of the sides, so that fixative can flow around the tissue. Also, small specimens should be placed between sponges or in tissue paper to prevent being lost during processing.
8) Take specimen photographs liberally, particularly for complicated or interesting specimens.
9) Proofread your gross. This is a legal document, so make sure it makes sense and is error-free.
General outline of a gross description:
- Description of what is received
- Labeling
- Orientation (either provided or determined by anatomy)
- Fixative (vs fresh)
- General description (without sectioning)
- Organs and tissues
- Dimensions (and sometimes weight)
- Obvious lesions
- Description of margins and inking
- Include a clear key, (e.g., Posterior = black)
- Additional description after dissection/sectioning
- Description of any mass lesions
- Include dimensions, appearance, circumscription
- Include distance to any margins and adjacent structures
- Description of any general abnormalities
- Description of any mass lesions
- Description of any lymph nodes, polyps, or secondary lesions.
- Section summary key (for quick reference later)
A general template:
The specimen is received in formalin labeled, “***.” The specimen consists of a single unoriented fragment of *** tissue that measures *** by *** by *** cm.
At the center of the specimen is a *** that measures *** by *** by *** cm. This is *** from the closest specimen edge.
The specimen is inked as follows:
*** = ***
*** = ***
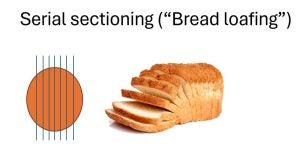
The specimen is serially sectioned revealing ***.
Histologic sections are submitted as follows:
A1. ***
A2. ***
Some examples:
For a GI biopsy:
STOMACH, ANTRUM, r/o h pylori: Received in formalin, in a container labeled with patient’s name, medical record number and designated “stomach, antrum,” is a 0.4 x 0.3 x 0.2 cm fragment of soft tissue. The specimen is entirely submitted in cassette A1.
For an Appendix:
APPENDIX, – Received in formalin, labeled with the patient’s name, medical record number, and designated “APPENDIX”, is an unopened vermiform appendix (8.8 x 1.4 x 1.3 cm) with attached mesoappendix (4.2 x 0.8 x 0.6 cm). The surgical margin is inked black. The serosa is pink-purple with a tan near the surgical margin (inked orange). The lumen is dilated and contains a fecalith and pus. The tip is patent. The muscular wall thickness ranges from 0.1 cm-0.3 cm. The cut surfaces of the periappendiceal fat are unremarkable. No mass lesions, nodules or perforations are identified within the appendix. Representative sections are submitted as follows:
A1: proximal margin en face (inked black), cross sections of body and peri-appendiceal soft tissue and a longitudinal section of the tip
Some Key Margin/Section Illustrations:
Some of my favorite resources:
Surgical Pathology Dissection: An Illustrated Guide 2nd Edition by William H. Westra et al.
Manual of Surgical Pathology 3rd Edition by Susan C. Lester